It all started with...
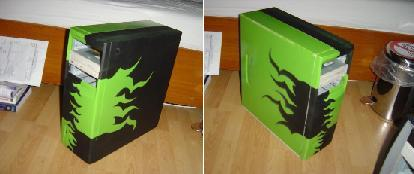
a beautiful compaq deskpro case. I've had it for awhile now, been using it to test hardware / software tweaks. I did however have big plans for the case, when Pentium 2's suddenly became obsolete. In absence of a better idea, I turned to painting the case.
Thank God for originality
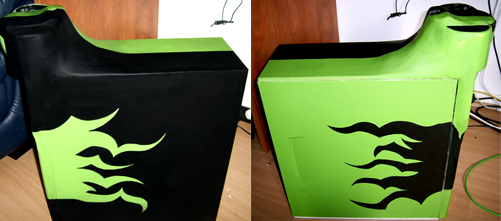
I have painted cases before, and it's not getting more exciting. The main reason for that is of course me solely painting flames on the things. When paint is involved, i'm simply not that original.Fortunately I had a somewhat original idea to let two colors of flames flow towards eachother from both sides towards the front. A green side and a black side, with flames of inverted colors on it, going to the front and merging there. Even though they're flames, I still got my desired originality!

..however!
Even though the paintjob itself was not too bad, I can't help seeing the case as just another case with some new colors on it. When you see it like that it's just not that spectacular as one would hope, nobody really wants to read about a case getting a new color. In fact, cases get new colors all the time, do you remember those yellow cases everyone had before switching to gray and black and such? I can tell you one thing, they weren't always yellow.Should you, however, combine this case with the world's best caffeine-containing refreshment, this mod can still be saved!

And the Coffee PC is born.
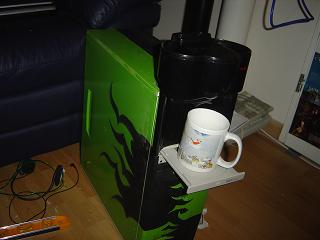
The location of the coffeemaker is of course most ideal on top at the front. I cut up the frame at the front of the case to make room for the coffeemaker. The top two 5.25" drive spots were casualties in this caffeine-soaked war.The 5.25" drives were cut out just as the front, leaving the back intact. This has the advantage of making the inside of the case easier to insulate. The insulation material can be attached to the 5.25" frame, to make the heating element from the coffee maker and the PC parts play nice.
The coffeemaker was cut open as well, in order to fit in the frame. The coffeemaker is attached to the inside of the case with aluminum corner brackets. The power cable is reattached to the coffeemaker, and leads out the back of the case into a second power outlet for it's power.

A bit of paint wouldn't do it any harm.
It's all nice and everything, but the front, in particular that huge black block on the top isn't very fashionable. That's gotta change.It was my ambition to let the project look as one. The goal of the project is a Coffee PC, and not a PC with coffee maker.
With that in mind i spent a lot of coving adhesive to the coffee maker integration project. Which, by the way, was a terrible idea. I'll never know how that got to sound good in my head. Coving adhesive shrinks, mainly because it's meant as an adhesive, thus, it won't work as filler. It's a shocker aint it. Four days later it looked almost as if the stuff was never put on, it was only noticable by the sheer amount of crap it left on the case itself.
After noticing my epic fail in executing such a glorious idea, I managed to fix the Coffee PC with M42d, using fiber glass cloth, streamlining the coffee maker with the pc itself. The fiberglass extended a bit to the back, making the coffeemaker and pc more of a whole. The fiber glass hardened with epoxy, after which I sanded everything down, to get it just right.
When all that was done, I painted it in the style of the whole case. Of course, after my previous stunts, it was a piece of cake. Hmm cake.

But it can still be improved!
I'm happy the way the case looks, and using the case itself (inserting hardware, using the coffee maker) is all quite practical. However it wasn't that spectacular, and the second power cable sticking out the PSU at the back was a bit clumsy, problematic and not really that practical.That's why I made a PCB that can turn the coffee maker on and off through a relais. The additional power outlet to power the coffee maker was soldered parallel on the power supply, to get rid of that second power cable.

Wait what? How does that work?
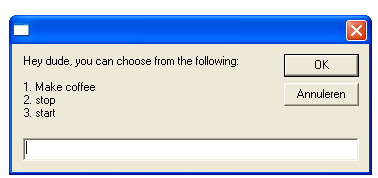
The relay gets it's power from a molex connector on the power supply; a small amount however, just enough to not flip the relay. Second connection to the relay is a cable to the COM port on the PC. Thirdly, the relay is hooked up to the power cable to the PSU that powers the coffee maker. I wrote a script in Visual Basic Scripting, that uses a module to enable the COM port on the PC. The power on the COM connection is enough to flip over the relay, thus giving the coffee maker it's much needed power, which makes the coffee maker do it's thing. The script enables the PC to make coffee with the push of a button!
Ernesto on Tuesday 20-10-2009
ah coffee, that's very nice. Someone should sell "Programmers computer" with a built in coffee maker.
I think it'll look even better if you paint the cd tray and the inside of the case, at least the side covers so you can't see that white color when the tray opens.
But anyway, very nice. I wish i could have one of those in my office but probably my boss wouldn't let me.
Shantanu on Friday 13-11-2009
Awesome!
I've featured your project on our site - www.atHack.com :-)
http://www.athack.com/2009/11/bytemods-coffeepc/
Awesome!
I've featured your project on our site - www.atHack.com :-)
http://www.athack.com/2009/11/bytemods-coffeepc/
Chris on Friday 20-11-2009
Dumb. Way to create a major heat issue.
Dumb. Way to create a major heat issue.
Tim Quax on Friday 20-11-2009
@Shantanu:
Awesome, thanks :)
@Chris:
You could always consider reading the page. If your own intelligence permits you, that is. It clearly states the back of the 5.25" drive is kept intact, which is covered with insulation to keep the temperatures low.
@Shantanu:
Awesome, thanks :)
@Chris:
You could always consider reading the page. If your own intelligence permits you, that is. It clearly states the back of the 5.25" drive is kept intact, which is covered with insulation to keep the temperatures low.
Factopo on Friday 20-11-2009
Wow, this is a really cool mod. Check out Factopo and see if there are any other mod ideas.
Wow, this is a really cool mod. Check out Factopo and see if there are any other mod ideas.
Dennuz666 on Tuesday 24-11-2009
I want this one with tea ;-)
I want this one with tea ;-)
Jeroen Stengs on Wednesday 14-04-2010
I JUST TOUCHED IT!
I'm never washing my finger again O.O
I JUST TOUCHED IT!
I'm never washing my finger again O.O
the cook on Friday 24-06-2011
you forgot the toaster & the mini fridge. LOL
you forgot the toaster & the mini fridge. LOL
tom wood on Friday 07-10-2011
will you send it in the post im really hungry but make it hack a toaster built in on the side and then a fridge on the other side and then you would have the perfect lazy person computer
will you send it in the post im really hungry but make it hack a toaster built in on the side and then a fridge on the other side and then you would have the perfect lazy person computer
lol on Thursday 14-06-2012
lol.
lol.


